Livechatoo API for Web Developers
See basic information about how to implement Livechatoo on your website and advanced features such as linking Livechatoo with your website.
Implementing
While you administer your Livechatoo account, you can copy main JS code to insert anywhere on your page. The code is asynchronous and will therefore not affect loading your page.
Basic Embedded ChatBar Functions:
            // initializing directly with settings

            livechatoo.embed.init({account : '...', lang : 'en', side : 'right'});


            // setting up and then initializing

            livechatoo.embed.options = {account : '...', lang : 'en', side : 'left'};

            livechatoo.embed.init();


            // verifying status

            alert(livechatoo.embed.status());


            new
            // disable standard session sharing between multiple domains

            livechatoo.embed.init({account : '...', session_per_host : true});


            // hide ChatBar

            livechatoo.embed.stop();


            // show/hide ChatBar

            livechatoo.embed.flip();


            // show/hide bubble

            livechatoo.embed.init({account : '...', bubble : true/false});

            livechatoo.embed.bubble(true);

            livechatoo.embed.bubble(false);


            new
            // reinitialization (useful for websites with "JavaScript History API")

            livechatoo.embed.reload();


            // changing the side

            livechatoo.embed.switch_side('right');

            livechatoo.embed.switch_side('left');
Basic PopUp Window Functions:
          // initializing e.g. after clicking on an image

          livechatoo.popup.init({account : '...', lang : 'en', mode : 'custom'});


          // examples with bubbles (btype: right1, right2, right3, left1, left2, left3)

          livechatoo.popup.init({account : '...', lang : 'en', mode : 'bubble', btype : 'left1'});


          livechatoo.popup.init({account : '...', lang : 'en', mode : 'bubble', btype : 'left3'});


          livechatoo.popup.init({account : '...', lang : 'en', mode : 'bubble', btype : 'right2'});


          // verifying status

          alert(livechatoo.popup.status());


          new
          // disable standard session sharing across multiple domains

          livechatoo.popup.init({account : '...', session_per_host : true});


          // hiding a bubble and closing a popup

          livechatoo.popup.stop();


          // only closing a popup

          livechatoo.popup.close();
Changing statuses
When initializing an Embedded ChatBar, you can specify the default state where a chat should be displayed. Available values for page parameter: 'start-online', 'online', 'start-offline', 'offline', 'hidden', 'mini'. A visitor can be reached by the operator even when a 'hidden' chat is not displayed but the visitor can be seen in the Visitors tab. 'mini' status is optimized for mobile devices and a Embedded ChatBar opens on a new page. If 'start-online' or 'online' is used and no operator is online, then ‘start-online’ negates to 'start-offline' and 'online' to 'offline'.
livechatoo.embed.init({account : '...', page : 'hidden'}); After initialization, you can also change status. For example, when you initialize, leave the chat hidden and, after clicking on the text link or image, run the desired status. For livechatoo.embed.page() is also the value 'chat' available unlike livechatoo.embed.init().
            livechatoo.embed.page('start-online');

            livechatoo.embed.page('online');

            livechatoo.embed.page('start-offline');

            livechatoo.embed.page('offline');

            livechatoo.embed.page('hidden');

            livechatoo.embed.page('mini');

            livechatoo.embed.page('chat');
Custom CSS styles
It is possible to include custom CSS styles in the Embedded ChatBar and the PopUp window, allowing stronger customization of the design features than offered by the web interface in the administration. The css_text parameter is used for inline styles (if there is lack of CSS code) and the css_file parameter for an external style (if there is too much CSS code).
            livechatoo.embed.init({account : '...', css_text : '...CSS...'});


            livechatoo.embed.init({account : '...', css_file : '//example.com/file.css'});


            livechatoo.popup.init({account : '...', mode : 'custom', css_text : '...CSS...'});


            livechatoo.popup.init({account : '...', mode : 'custom', css_file : '//example.com/file.css'});
Interactive chat window opening
Automatic addressing of visitors can be set up easily through the administration, or run manually via the API, if you wish to link the chat initiation to, for example, the onclick event on the web. To begin the chat, use the livechatoo.embed.page('chat') status change with the second (optional) argument, which is used to set the parameters of proactive chat. The operator will be called in only after a visitor responds to proactive chat by sending the first message.
livechatoo.embed.page('chat', {message : 'Text of Message', departments : '2,5', operators : '1,3,8', department_name : 'Retention Department', operator_name : 'Great Offer', operator_photo : '//example.com/discount.jpg'});
)
All parameters proactive chat are optional. The message parameter is a message that appears after opening the chat box. When this parameter is omitted, the welcome message of the assigned operator is displayed. The departments and operators parameters serve to define the ID departments or ID operators, to whom the chat may be assigned. Parameters work similarly to the Different departments in subsites and Different operators in subsites. Department name (department_name), operator name (operator_name) and their photo (operator_photo) will be displayed automatically based on the assigned operator, but you can also use your own values, for example, according to ongoing event/campaign and the like.
Optimizing for mobile devices
Livechatoo can automatically tailor Embedded ChatBar for mobile devices. The Embedded ChatBar is smaller on mobiles, there are no bubbles and chats open on a new page. If you wish to be forced to use or not use mobile mode, set your mobile parameter to either true or false.
livechatoo.embed.init({account : '...', lang : 'en', side : 'right', mobile : true});
Pre-filled data
If the web contains a login section, then you can send Livechatoo the logged-in user’s name, email and phone. Live chat operators can then see chat users together with data about them. Parameter c_name is the name from the visitor's perspective and c_name_byop is the name visible just by the operator. Usually, however, just c_name is used. If the user is not logged in, the parameter values may be left blank. The parameters can be also used for the popup chat window livechatoo.popup.init().
livechatoo.embed.init({account : '...', c_name : 'Name', c_name_byop : 'Name visible only for operator', c_email : 'email@example.com', c_phone : '0123 456 789'});
URL addresses can be set up in administration for: Contact, FAQ a Processing of Personal Data to be used in the chat window. However, you can also set up these URL addresses as described below. If the URL address for Processing of Personal Data is filled either in administration or through API, then the client has to confirm the consent to the processing of personal data (email or phone) before they are sent.
livechatoo.embed.init({account : '...', url_contact : 'https://example.com/contact', url_faq : 'https://example.com/faq', url_privacy : 'https://example.com/privacy'});
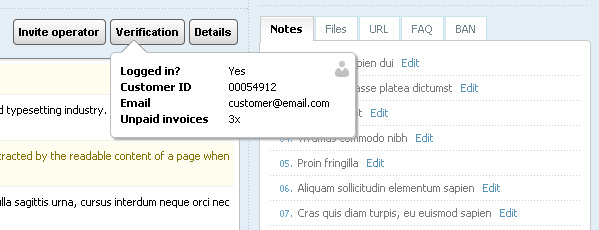
Verifying identity using your API
This feature allows operators to actually verify whether a chat user has logged onto the site and under whose account. Then the operators are able to accept requests for changes under the chat user's account. If a chat user asks for changes to be made under their account and is not logged on, the operator can invite them during a chat to log onto the site and additionally verify whether their requirements can be accepted. The JS code can be extended by another parameter custom whose value is set by you.
livechatoo.embed.init({account : '...', custom : 'PHPSESSID=s830qamomducb6pm0a'})
When administering the Settings tab, the API URL where your defined value for custom was sent needs to be filled. You can use your website’s session ID, for example, as the value for custom. Your API only verifies who is logged onto that ID. Your API result is seen by the operator. Example script for your own API in PHP: api_url.php
Different departments in subsites
If a site includes a section with completely different products/services, then the JS code can be defined for the section whose department (de facto operators) should be displayed. This allows you to prevent a customer in the “Mobile Flat Fee” section from selecting an operator in a completely different department – e.g. “Internet and Television”. The ID of the given departments must be entered as the departments parameter value. ID departments are listed in the Departments tab in Administration.
livechatoo.embed.init({account : '...', departments : '2,5'})
If the departments parameter is omitted or empty, all departments are displayed. In order for the departments parameter to be used, department support must be enabled in settings.
Different operators in subsites
If you need to assign operators to different pages, in the JS code on the particular site it is possible to define which operators should be displayed. The ID of the given operators must be entered as the operators parameter value. ID operators are listed in the Operators tab in Administration.
livechatoo.embed.init({account : '...', operators : '1,3,8'});
If the operators parameter is omitted or empty, all operators are displayed.
Cloning of operators for departments
In the list of operators from which a visitor selects the operator prior to chatting or an offline message, you can virtually assign operators to other departments as well. The name of the operator and department to which they are to be assigned is indicated in the JS code (if the department does not exist, it will be automatically generated in the list). This function only has a purpose if you use the manual operator assignment.
            var data = {'John' : ['Eshop Orders', 'Tech. Support'], 'Alex' : ['Tech. Support']};

            livechatoo.embed.init({account : '...', clone_operators : data});
Targeted sites
Visitors who reach a certain target (e.g. Order, Basket, etc.) can be highlighted by setting up target pages. You can then give these visitors priority and more attention. In the URL, you can use wildcard character * (asterisk), which replaces 0 or more characters.
          // tracking a target

          livechatoo.embed.init({account : '...', target : 'http://example.com/order'});


          // tracking more targets

          livechatoo.embed.init({account : '...', target : ['http://example.com/order', '*example.com/basket', ...]});

Callback events
Callback events enable launching custom functions. Currently the following events are available:
onload
Event fires after loading the Embedded ChatBar. The first argument of your function will be the objects with different data: data.page - a status, in which the Embedded ChatBar appeared, data.online - whether the operator is online, and the like.
            // test of all paramaters and their values

            var callback = function(data) {

              for (var i in data)

                alert(i + ' = ' + data[i]);

            };

            livechatoo.embed.init({account : '...', onload : callback});
onchange
Event fires when minimizing, restoring or maximizing chat box during a chat.
            var callback = function(data) {

              alert(data.chat_status); // values min/res/max

            };

            livechatoo.embed.init({account : '...', onchange : callback});
onchatstart
Event fires once at the start of the chat. The first argument of your function will be an object with a ticket (data.ticket) and a chat initiator (data.initiator) with possible values: 'client', 'operator', 'api', 'trigger'. Event is automatically recorded in your Google Analytics account in the Behavior » Events section.
            var callback = function(data) {

              alert(data.ticket + '; ' + data.initiator);

            };

            livechatoo.embed.init({account : '...', onchatstart : callback});
onchatopened
Event fires repeatedly after loading the Embedded ChatBar during ongoing chat. The data.ticket and data.initiator are available like with onchatstart. The event can be used, for example, to record conversions in Google Analytics during a chat. Conversion (e.g. an order) can occur at any time during an ongoing chat.
            // after the order, set the order value for the order_amount variable in the JS code

            var callback = function(data) {

              if (window.order_amount)

                ga('send', 'event', 'Livechatoo', 'Conversion', data.ticket, order_amount);

            };

            livechatoo.embed.init({account : '...', onchatopened : callback});
onchatrating
Event fires at the moment when the visitor sends a chat rating. The first argument of your function will be an object with a ticket (data.ticket), visitor’s information (data.name, data.email, data.phone), the number of stars (data.rating from 1 to 5), verbal rating (data.message) and data of the operator, who was rated (data.operator_id, data.department_id). Event is automatically recorded in your Google Analytics account in the Behavior » Events section.
            var callback = function(data) {

              alert(data.ticket + '; ' + data.rating + '; ' + data.message);

            };

            livechatoo.embed.init({account : '...', onchatrating : callback});
onofflinemessage
Event fires at the moment when the visitor sends offline message. The first argument of your function will be an object with the visitor’s information (data.name, data.email, data.phone) and message (data.message). If you are using manual operator assignment, the ID of the selected operator (data.operator_id) will also be available. Event is automatically recorded in your Google Analytics account in the Behavior » Events section.
            var callback = function(data) {

              alert(data.name + '; ' + data.email + '; ' + data.message);

            };

            livechatoo.embed.init({account : '...', onofflinemessage : callback});
ontrigger
Event fires at the moment when the trigger is launched. The first argument of your function will be an object with the trigger’s information (data.id, data.title). Event is automatically recorded in your Google Analytics account in the Behavior » Events section.
            var callback = function(data) {

              alert(data.id + '; ' + data.title);

            };

            livechatoo.embed.init({account : '...', ontrigger : callback});
onnamerequired
Event fires at the moment when the visitor accepts or declines the invitation to enter a name before the chat. The name request before chat must be set up in the administration. Event is automatically recorded in your Google Analytics account in the Behavior » Events section.
            var callback = function(data) {

              if (data.accepted == true)

                alert('Name accepted: ' + data.name);

              else

                alert('Name declined');

            };

            livechatoo.embed.init({account : '...', onnamerequired : callback});
onemailrequired
Event fires at the moment when the visitor accepts or declines the invitation to enter an email before the chat. The email request before chat must be set up in the administration. Event is automatically recorded in your Google Analytics account in the Behavior » Events section.
            var callback = function(data) {

              if (data.accepted == true)

                alert('Email accepted: ' + data.email);

              else

                alert('Email declined');

            };

            livechatoo.embed.init({account : '...', onemailrequired : callback});
onphonerequired
Event fires at the moment when the visitor accepts or declines the invitation to enter a phone before the chat. The phone request before chat must be set up in the administration. Event is automatically recorded in your Google Analytics account in the Behavior » Events section.
            var callback = function(data) {

              if (data.accepted == true)

                alert('Phone accepted: ' + data.phone);

              else

                alert('Phone declined');

            };

            livechatoo.embed.init({account : '...', onphonerequired : callback});